Local Storage – Creating Mirror Volume (RAID 1)
Press Win + R to get the Run dialogue box
Type diskmgmt.msc in the Run dialogue box to open Disk Management Window.
In the Disk Management window, we can see additional disks attached to our system. Select Additional disk.
Right-click and select the Online option to bring the disk online. (Local Storage)

Now Right-click on Disk again to select Initialize Disk option to initialize the disk

A dialog box will appear, select Disk and MBR option and Press ok. Repeat the steps for all additional disks. Learn Windows Server 2016.

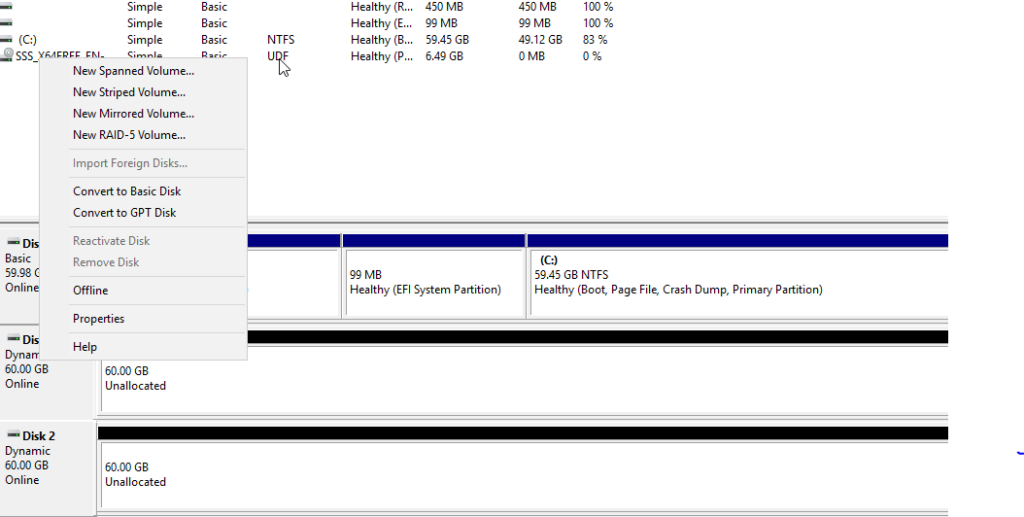
Again Right click on Disk 1 and select the Convert to Dynamic Disk option

Dialog Box will appear, select all the disks at once except the disk with the operating system.

All Disks can be seen Dynamic now. Right-click on the unallocated space of Disk 1 select New Mirrored Volume.

New Mirrored Volume Wizard will open. Select next. Add any 2 disks from the list. And select the size. You can select only 2 hard disks.

Assign the drive letter for accessing, click next

Select filesystem type. We have selected NTFS and click on the Next button.

After finishing the wizard, the Mirror volume will be created with Drive letter F.

Save some files on F:

Remove one of the hard drives involved in the Mirror. We can still find data in F:
Remove the Mirror by right click on F: & selecting Remove Mirror
Remove Disk 2 hard drive.

Add a new hard drive convert it to dynamic. Right-click on F: and select Add Mirror.

The mirror will be recreated with the new hard disk.
Local Storage – Creating RAID5 with 3 hard disks
Select 3 Hard Disks and convert them into dynamic.
Right-click on any one of the dynamic disks and select New RAID5 volume

Select 3 Hard Disks and select the desired size.

Select Drive Letter and File system. RAID 5 will be created

Keep some data in the created drive.

Even if one of the drives is removed or damaged we will see the data in the drive.

Add one more hard drive to replace the damaged ones. Convert it into dynamic. Now right-click on the existing RAID 5 volume and Select Repair Volume option

Select Newly added disk.

The disk will resynchronize together.

Grammarly – Best Free Grammar checker | Spelling checker | Mistake-free document writer for Laptop/Desktop
Online Surveys – Earn Real Money by Online Surveys
Kids Books – 10+ books for Kids | Age group 2 – 10 | Improve knowledge & Productivity


