Implementing Virtual Private Network
We are implementing a VPN server that will authenticate the internal user using RADIUS. On eiheducation.in which will be the RADIUS server open Server Manager and click on add roles and features, complete the configuration by selecting Network Policy and Access Service role from server roles.
Now again go to Server Manager, Tools, and click on Network Policy server.
In the Network Policy Server console, right lick NPS (local) and select Register Server in Active Directory. For authorization click on Ok.

In-Network Policy Server console, expand Template Management and right-click Shared Secrets, and select New.

In New RADIUS Shared Secret Template, specify the Template Name and shared secret and Confirm Shared secret and then click on Ok.

The new template will be listed in the shared secret.

In Template Management, right-click RADIUS Client and select new.

In New Radius Client, specify the Friendly name and IP address of the VPN server-internal interface, then select the newly created Shared Secrets Template and click on Ok.

The New RADIUS Clients policy will be listed in RADIUS Clients.

In-Network Policy Server console, select Accounting and click on Configure Accounting.

In the configure wizard, click next.

On select Accounting Options, select Log to a text file on the local computer and click next.

On Configure Local File Logging, click next.

In summary, click next.
In conclusion, click close.
In-Network Policy Server console, expand RADIUS Clients and Servers, right-click RADIUS Clients and select New.

In the New RADIUS Client, click on Select an existing template and click on Ok.

Now go to eihstore.com which is the member of the domain, open Server Manager, click add role and features and select Remote Access from server roles and DirectAccess and VPN (RAS) from role services and complete the installation.
In Server Manager, click on the Notification flag and click on Open and Getting Started Wizard.
In Server Manager, click on the Notification flag and click on Open the Getting Started Wizard.

On Configure Remote Access, select Deploy VPN only.

After select deploy VPN only, Routing and Remote Access console will open. In the Routing and Remote Access console, right-click on eihstore and select Configure and Enable Routing and Remote Access.


On routing and remote access server setup wizard click next
On Configuration, select Remote access (dial-up or VPN), then click Next.


On Remote Access, select VPN and Click next.
On VPN Connection, select the network interface that connects to the internet and uncheck the Enable security… click next.

On IP Address Assignment, select from a specific range of addresses and click on next

On Address Range Assignment, click Add then specify the Start IP address and click on Ok.
On Address range Assignment click on Next.

On Managing Remote Access Servers, select yes, set up this server to work with a RADIUS server, and click next.

On RADIUS Server Selection, specify the Primary RADIUS Server ad Shared Secret and click next.

On Completing the Routing and Remote Access Server Setup wizard, click finish.

Now go to MCSA.eiheducation.in, open Network Policy Server, expand Policies, and select Network Policies. Under Policy Name, right-click Connections to Microsoft Routing and Remote Access server and click on disable.

In Policies, right-click Network Policies and select New.

On Specify Network Policy Name and Connection type, specify the Policy name and select Remote Access Server ( VPN-Dial up ) from Type of network access server and click on next.

On Specify Conditions, click on Add and select NASPort Type and click Add

In NPS Port Type, select Virtual (VPN) and click ok.

On Specify Conditions, after adding the condition click on next.

On Specify Access Permission, select Access granted and click next.

On Configure Authentication Methods, click next.

On Configure Constraints, click next.

On Configure Settings, click next.

On Completing New Network Policy, click finish.

Now go to a Client machine for creating a VPN client connection. Open Network and Sharing Center, click on setup new connection or network.

On Choose a connection option, select Connect to a workplace and click Next.

On how do you want to connect? Select use my Internet connection (VPN) and click next.

Select I’ll set up an Internet connection later and click Next.
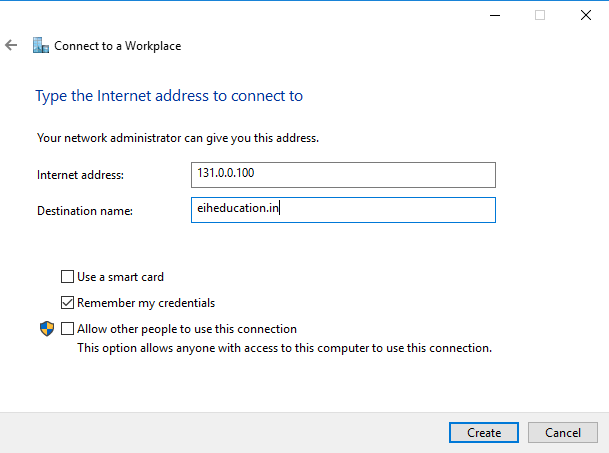
Specify the Internet Address of VPN Server and Destination name as your domain name and click on creating.

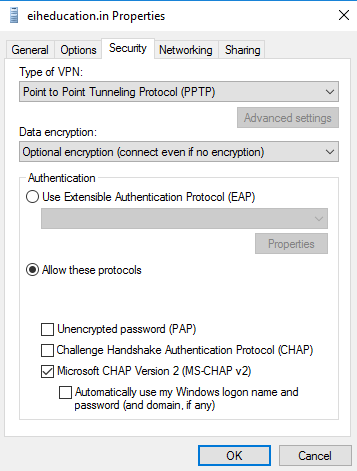
Go to Network Connections, right-click the VPN connection and go to properties.

On the Security tab, select the type of VPN as Point to Point Tunneling Protocol (PPTP) and click on Ok.

Now open the setting and go to VPN, select the VPN connection, click on Connect.

It will prompt for username and Password, in that specify the credentials of your organization which VPN Connectivity authorization and click on Ok.
Check Out the Headphones – 50% to 70% Off
Check Out the Earbuds – 50% to 70% Off
Grammarly – Best Free Grammar checker | Spelling checker | Mistake-free document writer for Laptop/Desktop
Check Out The LAB Configuration eBook – Class A, Class B, Class C, MiN worth $78 Get at $18


